
Download & Execute
The Jenkins continuous integration solution is very similar to Hudson. You can configure a regular security analysis of your APEX applications using Jenkins and ApexSec.
If you already have a Jenkins installation you can skip to Adding an ApexSec Job below.
Jenkins can be downloaded as a WAR file that either drops into an existing Servlet container (such as Tomcat or Glassfish), or runs in a standalone mode. For simplicity we’ll use Jenkins in standalone mode by launching from the command-line as follows:
java -jar jenkins.war
Once running, you can access the Jenkins service that is listening locally on port 8080 by pointing your browser at the following URL:
http://localhost:8080/
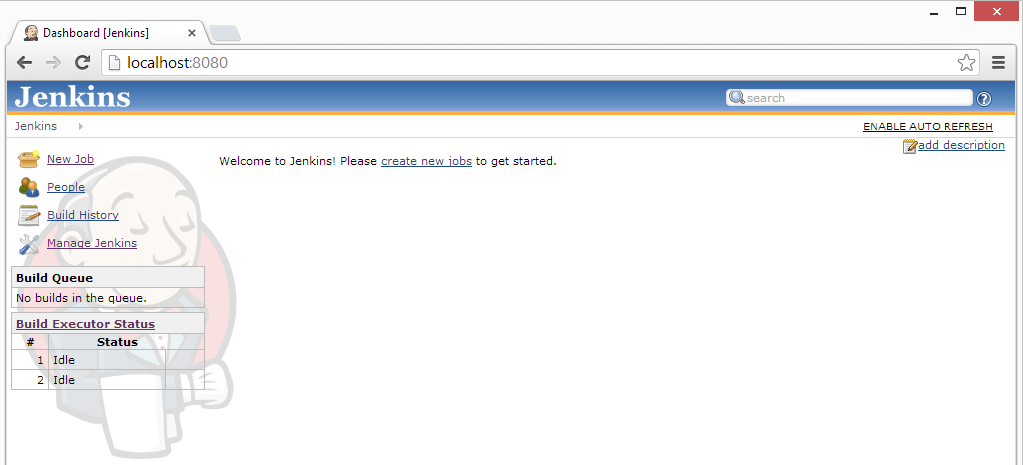
The Jenkins homepage should then be displayed.
Note: This is not intended to be a complete tutorial in Jenkins. For more specific information about running and managing Jenkins please see their tutorials and wiki.
Adding an ApexSec Job
On the initial Jenkins dashboard view, the menu on the left contains a New Job entry. This is where we configure our ApexSec job; click New Job and enter a name for this job. We’ll use “ApexSec BigBadBlog” as we’re going to schedule an automated security assessment of our sample vulnerable application, the Big Bad Blog. The type of job should be the default: Build a free-style software project.
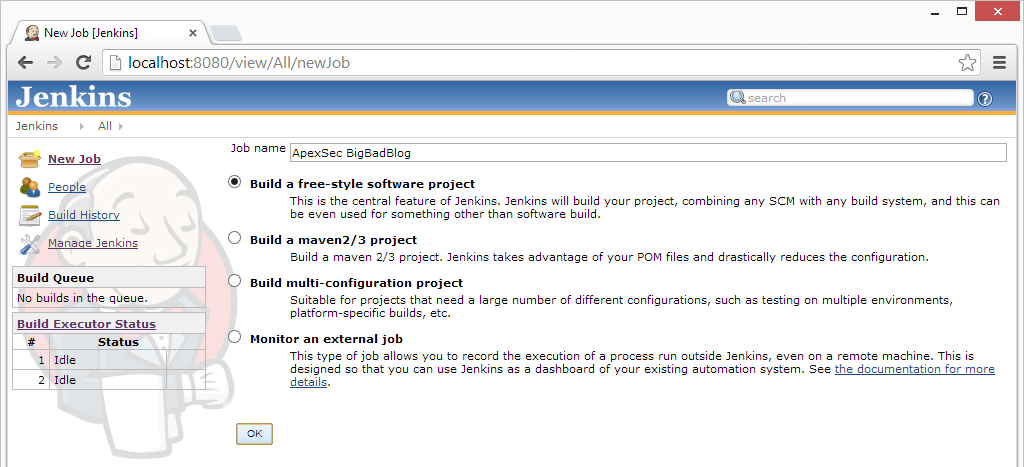
Click OK to continue to the job configuration page. This next screen presents various fields that can be used to specify how the build job should be performed. By setting three of these settings we can show Jenkins how to execute ApexSec and collect the results.
Advanced Project Options
In Advanced Project Options | Use custom workspace, enter the directory to store the JUnit XML output file:
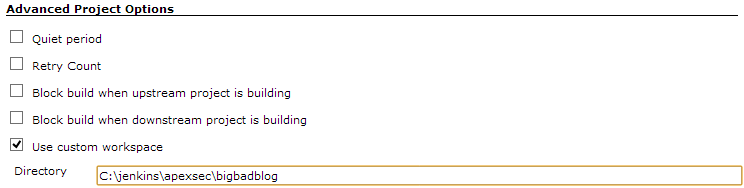
This can be any directory on your system, and will ultimately contain a single JUnit XML file from the most recent job run.
Build
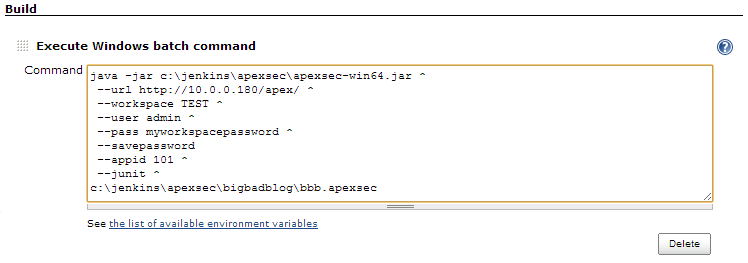
In the Build section, click Add build step and choose Execute Windows batch command from the list. The full command-line for ApexSec needs to be specified, describing how ApexSec should analyse your APEX applications, and where the results should be saved.
If you already have a pre-existing ApexSec project file and would prefer not to include your login details in Jenkins’ job configuration section, see Using the Re-Scan Feature below.
Note: We’re using the caret (^) character to split the Windows command-line over multiple lines for clarity; under Linux the backslash (\) should be used instead.
To connect to the APEX Application Builder:
java -jar c:\jenkins\apexsec\apexsec-win64.jar ^
 --url http://10.0.0.180/apex/ ^
 --workspace TEST ^
 --user admin ^
 --pass myworkspacepassword ^
 --savepassword ^
 --appid 101 ^
 --junit ^
c:\jenkins\apexsec\bigbadblog\bbb.apexsec
To connect via an Oracle database TNS connection:
java -jar c:\jenkins\apexsec\apexsec-win64.jar ^
 --host 10.0.0.180 ^
 --sid APEX421 ^
 --port 1521 ^
 --user TEST ^
 --pass myschemapassword ^
 --savepassword ^
 --appid 101 ^
 --junit ^
c:\jenkins\apexsec\bigbadblog\bbb.apexsec
To analyse an application exported to a file:
java -jar c:\jenkins\apexsec\apexsec-win64.jar ^
 --file c:\jenkins\apexsec\bigbadblog\BigBadBlog.sql ^
 --junit ^
c:\jenkins\apexsec\bigbadblog\bbb.apexsec
Note: If you are scheduling an ApexSec analysis of an APEX application based on the export file, remember that you’ll need to have some secondary process that ensures the export file represents the current development version of the application, such as a source-control checkout.
The location specified to save the ApexSec project file should match the custom workspace directory entered above.
For our job we will configure the command so ApexSec connects with the APEX Application Builder to access the BigBadBlog application (ID 101):
Post-build Actions
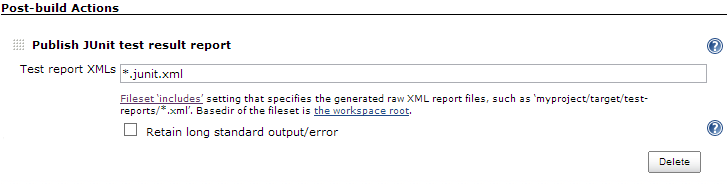
The final option is to configure a Post-build Action, of the type Publish JUnit test result report. The name of the JUnit XML output file should be entered here – this will be the ApexSec project file name from above with “.junit.xml” appended (“bbb.apexsec.junit.xml”), or you can use “*.junit.xml” to pick up all JUnit output within the workspace directory:
After configuring these settings, click Save. You now have a Jenkins job configured to launch ApexSec and capture the results.
Running the job
To launch the job that you have just created, click the Build Now link from the menu on the left of the Jenkins dashboard. This will cause Jenkins to launch the job and execute ApexSec. This ad-hoc method of execution is useful to check the configuration of your job. Once the run is complete, click on the date and time within the Build History section and check the Console Output and ensure that ApexSec was executed correctly.
With the build correctly configured, you can choose the Configure link from the menu to change the build job so that it executes on a regular schedule. Within the Build Triggers section tick the Build periodically option. (The format of the schedule is explained well by Jenkins in the associated help, which can be accessed via the question-mark icon next to the schedule text area.)
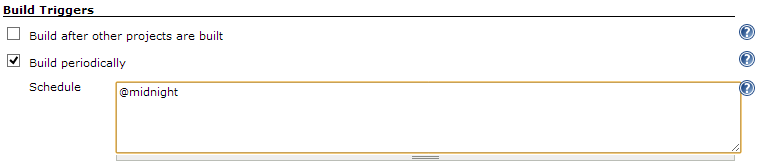
We’ve configured our job to execute every day, at midnight. Jenkins will then regularly launch ApexSec and over time we’ll be able to track differences in the security findings raised against our APEX application.
Using the Re-Scan Feature
You can use a pre-existing ApexSec project file to create your Jenkins job. To to this you must have checked the “Save Login Password with Project” option when saving your project file from ApexSec Desktop.
The password can also be saved in your ApexSec project file using the savepassword option from the command line. This option can be included in the Execute Windows Batch Command section of your Jenkins build (see the Build section).
To use a pre-existing ApexSec project file to create your Jenkins job, you can set the command in the Build section to use the rescan option:
java -jar c:\jenkins\apexsec\apexsec-win64.jar ^
 --rescan ^
 --junit ^
 c:\jenkins\apexsec\bigbadblog\bbb.apexsec
Monitoring Changes
The ApexSec project file that is produced by this scheduled build job can be opened within ApexSec, allowing a developer to mark findings as false-positives. Jenkins will no longer report these items as failures on subsequent runs.
Any new vulnerabilities introduced into the APEX application will be noted as additional failures, whereas issue that have been correctly resolved will no longer count as failures.
With our BigBadBlog application, after the initial run we use ApexSec Desktop to resolve some of the findings:
- Mark all the “Session State Encryption” items as false positives.
- Resolve the SQL Injection caused by a Substitution Variable on page 7.
- Fix Cross-Site Scripting / Direct Output issues on page 1.
With the Jenkins dashboard, the changes in the security risk profile are then displayed graphically.

Using Jenkins to perform a regular scheduled security assessment with ApexSec allows developers and term leaders to maintain a constant view on the risk current carried by their APEX applications. Increase in risk can be identified by development teams to ensure that vulnerabilities introduced into APEX applications are quickly rectified.